This post should probably have a sub-title: The penny drops
After a short-lived feeling of victory in this previous post, I set upon trying to get the Arduino and ESP8266 talking on this combo-board which I have had lying around for a few years.

I had, in that last post, got the ESP8266 connected to my wifi network and serving a little webpage, but I could not for the life of my work out how to make it talk to the ‘Uno’ ATMega328P.
Realisation #1
This came through looking through source code for SparkFun ESP Shield (source on Github). The two chips communication using serial (or UART) with the ESP8266 in ‘AT mode’
My problem was that I could not work out how to get my ESP8266 into this mythical AT Mode. You can test AT mode is working by sending AT to the chip in using serial input. If things are working you will get OK back. If not…nothing, like I was getting.
Realisation #2
(and I really hope this saves someone some time!)
I had been all gung-ho about uploading Arduino-style sketches to the ESP chip and getting websites to serve. I am not sure when/how the penny dropped. What I did not write about in the previous post is that I had been flashing new firmware onto the ESP8266 prior to sticking the Arduino-style code on. What I did not realise was that doing this overwrites the freshly-flashed AT mode firmware one was so happy about getting on the chip moments before with the ExpressIf firmware tool:
- When you use the ExpressIf tool successfully it sticks fresh up-to-date firmware on the chip which is running AT mode out-of-the-box.
- If you then stick something else on there from Arduino IDE or PlaformIO (or whatever) you break – well actually overwrite entirely – the AT firmware you just flashed.

THE SOLUTION:
To get AT working again, go back and re-flash using the ExpressIF tool (again!!!), and do not load anything else onto the ESP8266 chip afterwards.
Connect Using AT
BTW, to this point we are still working purely with the ESP8266 here, so if you have the RobotDyn UNO-ESP board, it needs to have the USB+ESP DIP switches ‘ON’ and everything else ‘OFF’.
The docs in ExpressIf’s docs are very good, and there are lots of cool things you can do with the AT instruction set – websockets, OTA upgrades and wot not.
First things first though, to connect to your wi-fi the command below worked for me:
AT+CWJAP_DEF="not_my_SSID","not_my_password"
 //CWJAP_DEF means these settings are saved as default onto ESP8266.
Replace ‘abc‘ with your 2.6Ghz wifi network SSID and ‘0123456789’ with the p/w. I think there may be some weird escapes you need if your SSID or password is especially elaborate, but that is your problem to solve.
Also in later versions of the AT instruction set, CWJAP, which you’ll see elsewhere, is replaced by CWJAP_DEF and CWJAP_CUR which connect and save the default SSID settings and connect using the currently saved settings respectively.
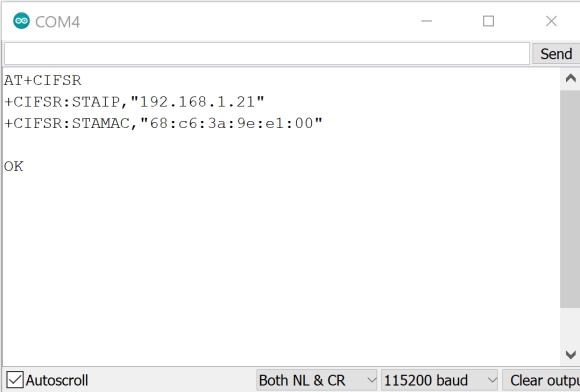
You should get a successfull connection. You can get your devices IP address on local network with ‘AT+CIFSR’:

Connection error?
I was getting the readout below when I tried to connect. It would get a connection-or-sorts, and a few seconds later it would disconnect.
AT+CWJAP="not_my_SSID","not_my_password"
WIFI CONNECTED
+CWJAP:1

FAIL
 //this happened after a couple of seconds
WIFI DISCONNECT
I found this post which fixed it. This command enables DCHP mode on your ESP8266 chip:
AT+CWDHCP=1,1Other pitfalls
In the image from Arduino IDE Serial console above, note the line endings mode `Both NL & CR`. AT expects a newline & carriage return, and the baud rate needs to be the same as that set on the chip (more on that later)
Incidentally, the baud, a unit of data transmission speed, is named after the French engineer Jean M. Emile Baudot who, according to Wikipedia, invented a multiplexed printing telegraph system. So now we know!
Wrap-up.
Pretty excited.
With AT you can pretty much use the ESP8266 as a wifi-dongle for your Arduino (or whatever). It does the wi-fi stuff and leaves you to do the interesting stuff.
But I have still not got the UNO and ESP8266 talking.
